Hey everyone,
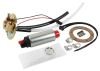
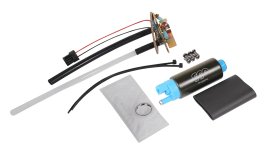
We wanted to share a quick walkthrough and some tips for installing the Classic Performance Products Small In-Tank Fuel Pump Assembly (#FK-F1, #CPFK-255, or #CPFK-340 kits). This system is designed to work with most submersible fuel pumps and comes with everything needed for a clean, in-tank install.
Kit Includes:
- Pre-assembled housing w/ supply & return hoses
- Fuel pump (255 or 340 LPH depending on kit)
- Filter sock, clamps, zip ties, and mounting hardware
- Measure Tank Depth – Critical first step. Measure from the tank bottom (highest rib if ribbed) to the top mounting surface. This sets the final pump length.
- Trim Hoses to Fit – Use the depth measurement to cut the supply and return hoses accordingly. Make sure the filter sock clears the tank bottom.
- Secure Pump – Attach the pump to the housing, wire it up, and tie it securely to the return hose.
- Double Check Everything – Ensure hose clamps are tight, wires are routed cleanly, and the connector is fully seated.
- Install and Wire Up – Mount the assembly with the included gasket, and wire it using 12-gauge wire with a 15A fuse close to the battery.
Pro Tips:
- The pump has a 5/16" barb, use a short piece of return hose to sleeve it for a proper 3/8" hose fit.
- Make sure you tighten the ground inside the tank as well as outside.
Hope this helps make your install smoother! If anyone has questions or wants to share photos of their setup, let’s get a thread going.